More than just a submersible rack!
Lipavi racks originated to meet the need for better space utilization during home sous vide processing. Care must be taken to make sure that water circulates freely around each individual package to meet quality and safety standards. As sous vide has grown in popularity, vessels have been required to accommodate more and more packages of more and more types of food. Lipavi was among the first to introduce sous vide racks dedicated to this requirement for utilization in the home.
Since the racks are made from high quality stainless steel, they are, of course, water proof. They are also heat proof, oven proof, and rust proof within normal limits. They can be used in the process of hot and cold smoking without becoming permanently stained or damaged. This article and series of illustrations will show a few ways Lipavi racks can be used.
For the purposes of this article, we are processing two slabs of high quality organic pork spare ribs from Carlton Farms in Oregon, USA. The folks at Carlton have been producing pork and beef since the 1950’s. They take great pride in the quality and freshness of their product, as should anyone who uses sous vide technology.
We are also processing thighs and breasts from fresh chickens that we purchased at Costco, the Foster Farms Brand. They are also of high quality, and competitively priced.
In the first slide below, the 3 lb./1.4Kg racks are removed from their packaging. The packaging that meat comes in should NEVER be used to process sous vide, because it is not intended to withstand heat, and is not manufactured to do so.

The meat is then either vacuum packaged or simply staged into Ziploc Freezer bags, which are rated to withstand typical sous vide temperatures. To see how to easily remove the air from a Ziploc Freezer bag, and how to process sous vide chicken, click HERE.
The size of the portion of meat may need to be reduced to fit into the dedicated bags, but sous vide technology is not size dependent. For this project we used extra large sleeves.
After sealing the pork spare ribs in bags, we processed via sous vide @
140F/60Cx24 hours,
as depicted in the fifth picture in the slide above.
To see how the chicken was processed, click HERE
Cold shocking is depicted in the sixth and last slide, and it is very important. After processing, all food should be shocked cold to 70F/21C BEFORE being staged into a refrigerator–whether it was prepared via sous vide or not. The typical home refrigerator is not designed to quickly cool hot food. Perishable products in the vicinity of the hot packages can also be temperature compromised by this exposure.
Cold shocking can be done in several ways, but with Lipavi vessels and racks, you can simply remove the water in the vessel. In this case, I used a siphon, visible suspended on the faucet. Then, the vessel can be refilled with cold water and/or ice to achieve the necessary temperature.
Using Lipavi racks for storage.
Once your packages have achieved 70F/21C, they can be refrigerated. Most people leave their improvised racks in the vessel, but the wire handles on each end of Lipavi racks make removable of the whole project very easy. Simply lift out the rack, and allow to drain for a few minutes. Then, the rack, with the food still in it, can be staged into a normal sized refrigerator, as shown below in the second picture.

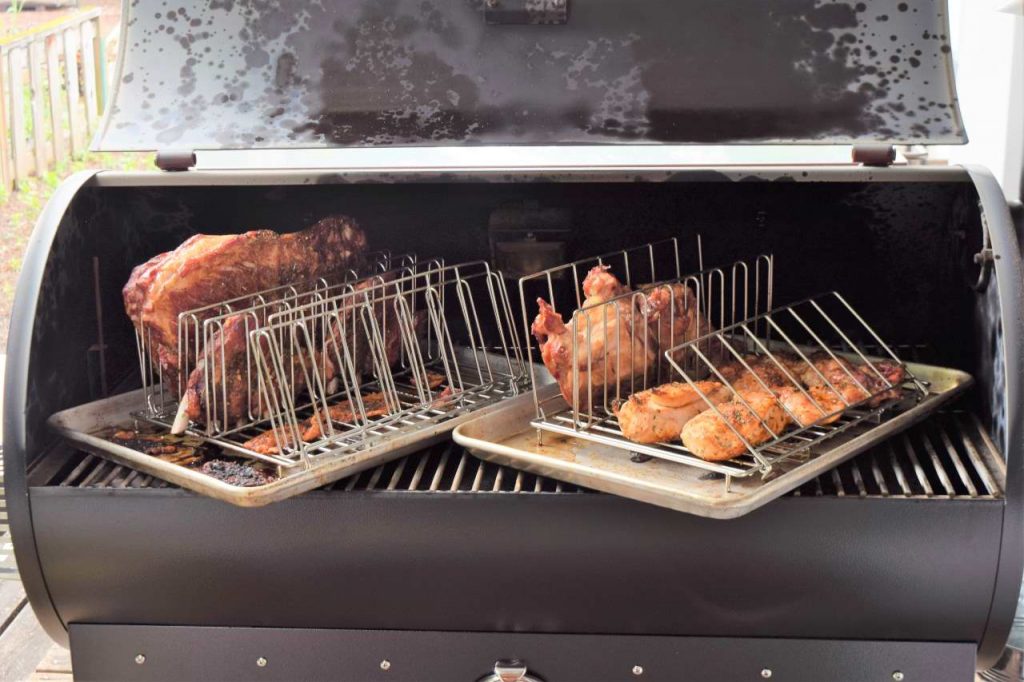
Hot smoking using Lipavi racks:
On day of service, remove the entire rack, and submerge the rack in hot tap water in order to dissolve the gel that forms around the proteins. This product, that we call Sous Jus™, can be saved for further processing later. For the full explanation of this, click HERE. Lay out some loose Lipavi racks on a rimmed sheet pan so that you can harvest the Sous Jus.
After the chicken and pork have drained, collect the juice from the pan and refrigerate. Lay the chicken and ribs out on parchment, this will save clean up later. Season as desired, I used a very simple rub for both meats:
By volume:
- Sugar, 2T.
- Paprika, 2T
- Salt, 1T
- Ground Black Pepper, 1 T.
- Parsley, dried, 1 cup.
- Onion, dried, flakes, 2T.
Sprinkle the seasoning over the chicken and ribs on both sides, and arrange on the racks. You can see that I separated the skin from the thighs and breasts, and laid it out on the rack, to get very crisp. This usually goes to the cook later as a guilty pleasure.
Once the racks are loaded, transfer the racks, and the sheet pans below them directly into the smoker. Even though most smokers have drip pans, using the sheet pans reduces the amount of grease and debris left behind. I find it easier to clean the sheet pans than to disassemble the racks and drip pans from the smoker itself.
Some people feel this limits the food’s exposure to the smoke, but my experience suggests that there is no way to avoid the smoke inside a smoker!
To simplify things, and to show the forgiveness of precision, we hot smoked the ribs AND the chicken both at
400F/204CX1 hour.
This was purposely a little bit “hot,” even for hot smoking. Since we are planning on doing a series on these tutorials, I decided to start at the higher range, and work our way down. Temperatures as low as
180F/82C
can provide equally excellent, and probably the best results of all. You will hear Pitmasters chant the mantra “Low and Slow,” which we see also applies to sous vide!

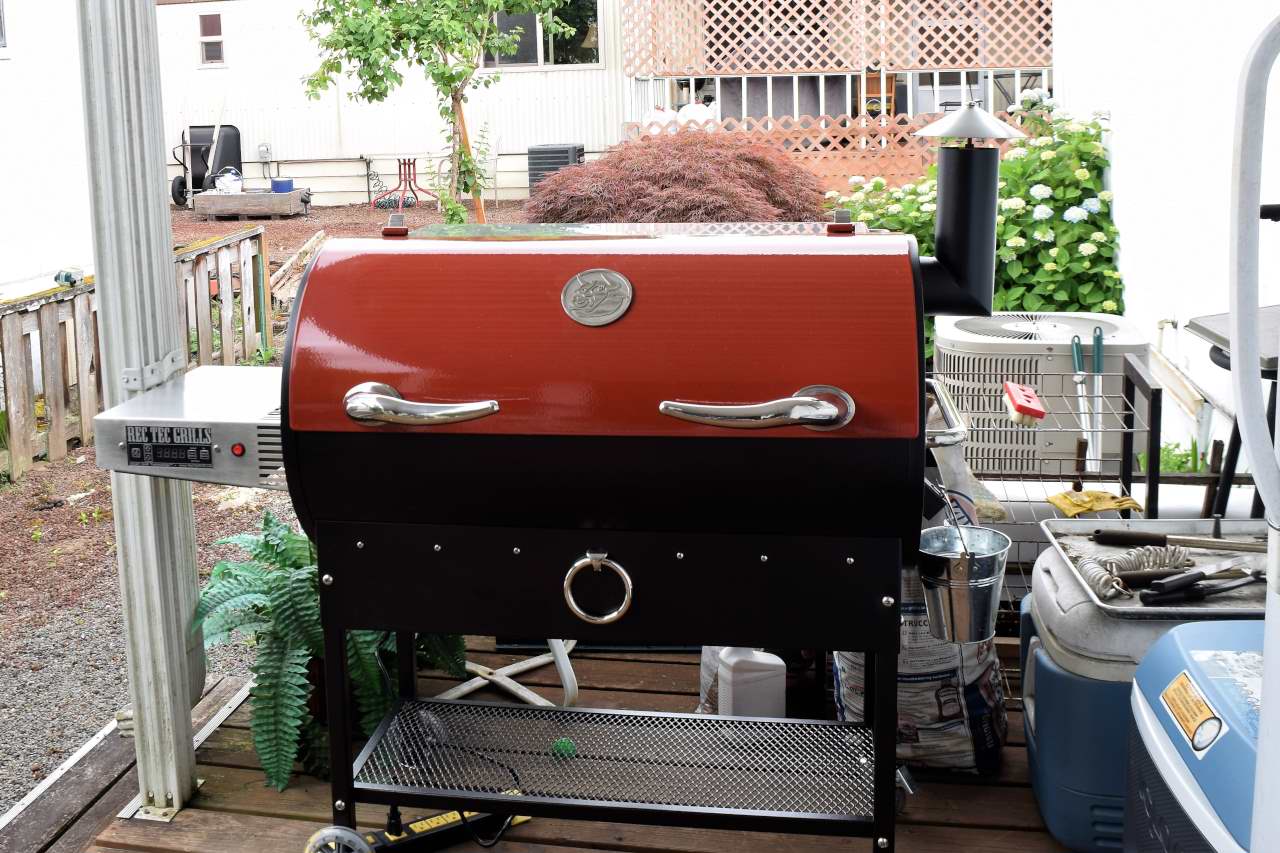
For the hot smoking, we used a RecTec 680 pellet grill that we recently acquired, see the picture below.
The RecTec is well suited for Sous-B-Q because it utilizes a PID controller to detect and manage temperature inside the smoker. These devices are very precise and predictable, and can minimize the amount of time spent “checking” to see how quickly your food is cooking.
Serving your Lipavi Sous-B-Q
After processing using the Lipavi racks, the food is easily and safely removed from the smoker. I recommend turning off the smoker, opening the door, and resisting the urge to dig in! Examine the sheet pans to see how much grease remains. The safest way to remove this is to fold and lay paper towels wherever you see grease accumulated. This prevents the grease from splashing out during transportation.
In a few moments, the racks are much easier to handle, but always use a hot pad. If you are travelling back inside, take the sheet pans with you. If you are staying outside, you can leave the sheet pans and just lift the racks out and deliver them to a covered picnic table!

Once you have arrived at your destination, you will realize just how convenient Lipavi racks made the whole experience. Rather than having disorganized piles of food piled precariously on your table, you are free to remove the food and the adjacent rack in a very systematic fashion.
Have some platters nearby to transfer the food to, and, once you have unloaded the racks, they are ready to wash either by hand or by machine, but, definitely, LATER!

After removing from the smoker, I used my special Sous Vide Barbecue Baste, which is a robust and zesty companion for steaks, ribs, chicken, and many other things too. It is an excellent alternative dip for French Fries and Onion Rings, which we also have an excellent recipe for.
I applied the baste to half of the items, you can see it distinguished in the third picture of the slide. On the left, no sauce, on the right, sauce. The bottom picture on the left has sauce on it. Despite its color, it is non-tomato based.
 I hope you found this article interesting and helpful. I keep finding applications for Lipavi racks, and I think I was the first to discover that they could be utilized up side down to help keep certain types of foods submerged during sous vide processing. No matter, you may find your own applications for these extremely versatile devices. Of course, they are freezer proof too!

Happy Processing!
Norm
Hi, It has come to our attention that you are using our client’s photographs on your site without a valid licence. We have already posted out all supporting documents to the address of your office. Please confirm once you have received them. In the meantime, we would like to invite you to settle this dispute by making the below payment of £500. Visual Rights Group Ltd, KBC Bank London, IBAN: GB39 KRED 1654 8703, 1135 11, Account Number: 03113511, Sort Code: 16-54-87 Once you have made the payment, please email us with your payment reference number. Please note that a failure to settle at this stage will only accrue greater costs once the matter is referred to court. I thank you for your cooperation and look forward to your reply. Yours sincerely, Visual Rights Group Ltd, Company No. 11747843, Polhill Business Centre, London Road, Polhill, TN14 7AA, Registered Address: 42-44 Clarendon Road, Watford WD17 1JJ
https://vitalitycbd.co.uk/products/cbd-gummy-bears
Hi, It has come to our attention that you are using our client’s photographs on your site without a valid licence. We have already posted out all supporting documents to the address of your office. Please confirm once you have received them. In the meantime, we would like to invite you to settle this dispute by making the below payment of £500. Visual Rights Group Ltd, KBC Bank London, IBAN: GB39 KRED 1654 8703, 1135 11, Account Number: 03113511, Sort Code: 16-54-87 Once you have made the payment, please email us with your payment reference number. Please note that a failure to settle at this stage will only accrue greater costs once the matter is referred to court. I thank you for your cooperation and look forward to your reply. Yours sincerely, Visual Rights Group Ltd, Company No. 11747843, Polhill Business Centre, London Road, Polhill, TN14 7AA, Registered Address: 42-44 Clarendon Road, Watford WD17 1JJ
https://www.goodrays.com/collections/cbd-gummies/
Hi, It has come to our attention that you are using our client’s photographs on your site without a valid licence. We have already posted out all supporting documents to the address of your office. Please confirm once you have received them. In the meantime, we would like to invite you to settle this dispute by making the below payment of £500. Visual Rights Group Ltd, KBC Bank London, IBAN: GB39 KRED 1654 8703, 1135 11, Account Number: 03113511, Sort Code: 16-54-87 Once you have made the payment, please email us with your payment reference number. Please note that a failure to settle at this stage will only accrue greater costs once the matter is referred to court. I thank you for your cooperation and look forward to your reply. Yours sincerely, Visual Rights Group Ltd, Company No. 11747843, Polhill Business Centre, London Road, Polhill, TN14 7AA, Registered Address: 42-44 Clarendon Road, Watford WD17 1JJ
https://flawlesscbd.co.uk/collections/cbd-gummies
Hi, It has come to our attention that you are using our client’s photographs on your site without a valid licence. We have already posted out all supporting documents to the address of your office. Please confirm once you have received them. In the meantime, we would like to invite you to settle this dispute by making the below payment of £500. Visual Rights Group Ltd, KBC Bank London, IBAN: GB39 KRED 1654 8703, 1135 11, Account Number: 03113511, Sort Code: 16-54-87 Once you have made the payment, please email us with your payment reference number. Please note that a failure to settle at this stage will only accrue greater costs once the matter is referred to court. I thank you for your cooperation and look forward to your reply. Yours sincerely, Visual Rights Group Ltd, Company No. 11747843, Polhill Business Centre, London Road, Polhill, TN14 7AA, Registered Address: 42-44 Clarendon Road, Watford WD17 1JJ
https://www.cbdoil.co.uk/product-category/cbd-gummies/
Hi, It has come to our attention that you are using our client’s photographs on your site without a valid licence. We have already posted out all supporting documents to the address of your office. Please confirm once you have received them. In the meantime, we would like to invite you to settle this dispute by making the below payment of £500. Visual Rights Group Ltd, KBC Bank London, IBAN: GB39 KRED 1654 8703, 1135 11, Account Number: 03113511, Sort Code: 16-54-87 Once you have made the payment, please email us with your payment reference number. Please note that a failure to settle at this stage will only accrue greater costs once the matter is referred to court. I thank you for your cooperation and look forward to your reply. Yours sincerely, Visual Rights Group Ltd, Company No. 11747843, Polhill Business Centre, London Road, Polhill, TN14 7AA, Registered Address: 42-44 Clarendon Road, Watford WD17 1JJ
https://www.cbd-guru.co.uk/product-category/cbd-gummies/
Hi, It has come to our attention that you are using our client’s photographs on your site without a valid licence. We have already posted out all supporting documents to the address of your office. Please confirm once you have received them. In the meantime, we would like to invite you to settle this dispute by making the below payment of £500. Visual Rights Group Ltd, KBC Bank London, IBAN: GB39 KRED 1654 8703, 1135 11, Account Number: 03113511, Sort Code: 16-54-87 Once you have made the payment, please email us with your payment reference number. Please note that a failure to settle at this stage will only accrue greater costs once the matter is referred to court. I thank you for your cooperation and look forward to your reply. Yours sincerely, Visual Rights Group Ltd, Company No. 11747843, Polhill Business Centre, London Road, Polhill, TN14 7AA, Registered Address: 42-44 Clarendon Road, Watford WD17 1JJ
https://vitl-cbd.com/
Hi, It has come to our attention that you are using our client’s photographs on your site without a valid licence. We have already posted out all supporting documents to the address of your office. Please confirm once you have received them. In the meantime, we would like to invite you to settle this dispute by making the below payment of £500. Visual Rights Group Ltd, KBC Bank London, IBAN: GB39 KRED 1654 8703, 1135 11, Account Number: 03113511, Sort Code: 16-54-87 Once you have made the payment, please email us with your payment reference number. Please note that a failure to settle at this stage will only accrue greater costs once the matter is referred to court. I thank you for your cooperation and look forward to your reply. Yours sincerely, Visual Rights Group Ltd, Company No. 11747843, Polhill Business Centre, London Road, Polhill, TN14 7AA, Registered Address: 42-44 Clarendon Road, Watford WD17 1JJ
https://britishcannabis.org/shop/cbd-gummies/
Hi, It has come to our attention that you are using our client’s photographs on your site without a valid licence. We have already posted out all supporting documents to the address of your office. Please confirm once you have received them. In the meantime, we would like to invite you to settle this dispute by making the below payment of £500. Visual Rights Group Ltd, KBC Bank London, IBAN: GB39 KRED 1654 8703, 1135 11, Account Number: 03113511, Sort Code: 16-54-87 Once you have made the payment, please email us with your payment reference number. Please note that a failure to settle at this stage will only accrue greater costs once the matter is referred to court. I thank you for your cooperation and look forward to your reply. Yours sincerely, Visual Rights Group Ltd, Company No. 11747843, Polhill Business Centre, London Road, Polhill, TN14 7AA, Registered Address: 42-44 Clarendon Road, Watford WD17 1JJ
https://www.simply-cbd.co.uk/collections/cbd-gummies-edibles
Hi, It has come to our attention that you are using our client’s photographs on your site without a valid licence. We have already posted out all supporting documents to the address of your office. Please confirm once you have received them. In the meantime, we would like to invite you to settle this dispute by making the below payment of £500. Visual Rights Group Ltd, KBC Bank London, IBAN: GB39 KRED 1654 8703, 1135 11, Account Number: 03113511, Sort Code: 16-54-87 Once you have made the payment, please email us with your payment reference number. Please note that a failure to settle at this stage will only accrue greater costs once the matter is referred to court. I thank you for your cooperation and look forward to your reply. Yours sincerely, Visual Rights Group Ltd, Company No. 11747843, Polhill Business Centre, London Road, Polhill, TN14 7AA, Registered Address: 42-44 Clarendon Road, Watford WD17 1JJ
https://vitalitycbd.co.uk/products/cbd-gummy-bears
Hi, It has come to our attention that you are using our client’s photographs on your site without a valid licence. We have already posted out all supporting documents to the address of your office. Please confirm once you have received them. In the meantime, we would like to invite you to settle this dispute by making the below payment of £500. Visual Rights Group Ltd, KBC Bank London, IBAN: GB39 KRED 1654 8703, 1135 11, Account Number: 03113511, Sort Code: 16-54-87 Once you have made the payment, please email us with your payment reference number. Please note that a failure to settle at this stage will only accrue greater costs once the matter is referred to court. I thank you for your cooperation and look forward to your reply. Yours sincerely, Visual Rights Group Ltd, Company No. 11747843, Polhill Business Centre, London Road, Polhill, TN14 7AA, Registered Address: 42-44 Clarendon Road, Watford WD17 1JJ
https://britishcannabis.org/shop/cbd-gummies/
Hi, It has come to our attention that you are using our client’s photographs on your site without a valid licence. We have already posted out all supporting documents to the address of your office. Please confirm once you have received them. In the meantime, we would like to invite you to settle this dispute by making the below payment of £500. Visual Rights Group Ltd, KBC Bank London, IBAN: GB39 KRED 1654 8703, 1135 11, Account Number: 03113511, Sort Code: 16-54-87 Once you have made the payment, please email us with your payment reference number. Please note that a failure to settle at this stage will only accrue greater costs once the matter is referred to court. I thank you for your cooperation and look forward to your reply. Yours sincerely, Visual Rights Group Ltd, Company No. 11747843, Polhill Business Centre, London Road, Polhill, TN14 7AA, Registered Address: 42-44 Clarendon Road, Watford WD17 1JJ
https://britishcbd.net/cbd-uk/cbd-edibles/
Hi, It has come to our attention that you are using our client’s photographs on your site without a valid licence. We have already posted out all supporting documents to the address of your office. Please confirm once you have received them. In the meantime, we would like to invite you to settle this dispute by making the below payment of £500. Visual Rights Group Ltd, KBC Bank London, IBAN: GB39 KRED 1654 8703, 1135 11, Account Number: 03113511, Sort Code: 16-54-87 Once you have made the payment, please email us with your payment reference number. Please note that a failure to settle at this stage will only accrue greater costs once the matter is referred to court. I thank you for your cooperation and look forward to your reply. Yours sincerely, Visual Rights Group Ltd, Company No. 11747843, Polhill Business Centre, London Road, Polhill, TN14 7AA, Registered Address: 42-44 Clarendon Road, Watford WD17 1JJ
https://www.cbd-guru.co.uk/product-category/cbd-gummies/
Hi, It has come to our attention that you are using our client’s photographs on your site without a valid licence. We have already posted out all supporting documents to the address of your office. Please confirm once you have received them. In the meantime, we would like to invite you to settle this dispute by making the below payment of £500. Visual Rights Group Ltd, KBC Bank London, IBAN: GB39 KRED 1654 8703, 1135 11, Account Number: 03113511, Sort Code: 16-54-87 Once you have made the payment, please email us with your payment reference number. Please note that a failure to settle at this stage will only accrue greater costs once the matter is referred to court. I thank you for your cooperation and look forward to your reply. Yours sincerely, Visual Rights Group Ltd, Company No. 11747843, Polhill Business Centre, London Road, Polhill, TN14 7AA, Registered Address: 42-44 Clarendon Road, Watford WD17 1JJ
https://orangecounty-cbd.com/collections/cbd-gummies-sweets
Hi, It has come to our attention that you are using our client’s photographs on your site without a valid licence. We have already posted out all supporting documents to the address of your office. Please confirm once you have received them. In the meantime, we would like to invite you to settle this dispute by making the below payment of £500. Visual Rights Group Ltd, KBC Bank London, IBAN: GB39 KRED 1654 8703, 1135 11, Account Number: 03113511, Sort Code: 16-54-87 Once you have made the payment, please email us with your payment reference number. Please note that a failure to settle at this stage will only accrue greater costs once the matter is referred to court. I thank you for your cooperation and look forward to your reply. Yours sincerely, Visual Rights Group Ltd, Company No. 11747843, Polhill Business Centre, London Road, Polhill, TN14 7AA, Registered Address: 42-44 Clarendon Road, Watford WD17 1JJ
https://herbalhealthcbd.co.uk/product-category/cbd-gummies/
Hi, It has come to our attention that you are using our client’s photographs on your site without a valid licence. We have already posted out all supporting documents to the address of your office. Please confirm once you have received them. In the meantime, we would like to invite you to settle this dispute by making the below payment of £500. Visual Rights Group Ltd, KBC Bank London, IBAN: GB39 KRED 1654 8703, 1135 11, Account Number: 03113511, Sort Code: 16-54-87 Once you have made the payment, please email us with your payment reference number. Please note that a failure to settle at this stage will only accrue greater costs once the matter is referred to court. I thank you for your cooperation and look forward to your reply. Yours sincerely, Visual Rights Group Ltd, Company No. 11747843, Polhill Business Centre, London Road, Polhill, TN14 7AA, Registered Address: 42-44 Clarendon Road, Watford WD17 1JJ
https://www.drugs.com/lifestyle/cbd-gummies-health-benefits-3515165/
Hi, It has come to our attention that you are using our client’s photographs on your site without a valid licence. We have already posted out all supporting documents to the address of your office. Please confirm once you have received them. In the meantime, we would like to invite you to settle this dispute by making the below payment of £500. Visual Rights Group Ltd, KBC Bank London, IBAN: GB39 KRED 1654 8703, 1135 11, Account Number: 03113511, Sort Code: 16-54-87 Once you have made the payment, please email us with your payment reference number. Please note that a failure to settle at this stage will only accrue greater costs once the matter is referred to court. I thank you for your cooperation and look forward to your reply. Yours sincerely, Visual Rights Group Ltd, Company No. 11747843, Polhill Business Centre, London Road, Polhill, TN14 7AA, Registered Address: 42-44 Clarendon Road, Watford WD17 1JJ
https://www.brownscbd.co.uk/cbd-gummies-uk-37-c.asp
Hi, It has come to our attention that you are using our client’s photographs on your site without a valid licence. We have already posted out all supporting documents to the address of your office. Please confirm once you have received them. In the meantime, we would like to invite you to settle this dispute by making the below payment of £500. Visual Rights Group Ltd, KBC Bank London, IBAN: GB39 KRED 1654 8703, 1135 11, Account Number: 03113511, Sort Code: 16-54-87 Once you have made the payment, please email us with your payment reference number. Please note that a failure to settle at this stage will only accrue greater costs once the matter is referred to court. I thank you for your cooperation and look forward to your reply. Yours sincerely, Visual Rights Group Ltd, Company No. 11747843, Polhill Business Centre, London Road, Polhill, TN14 7AA, Registered Address: 42-44 Clarendon Road, Watford WD17 1JJ
https://www.simply-cbd.co.uk/collections/cbd-gummies-edibles
Hi, It has come to our attention that you are using our client’s photographs on your site without a valid licence. We have already posted out all supporting documents to the address of your office. Please confirm once you have received them. In the meantime, we would like to invite you to settle this dispute by making the below payment of £500. Visual Rights Group Ltd, KBC Bank London, IBAN: GB39 KRED 1654 8703, 1135 11, Account Number: 03113511, Sort Code: 16-54-87 Once you have made the payment, please email us with your payment reference number. Please note that a failure to settle at this stage will only accrue greater costs once the matter is referred to court. I thank you for your cooperation and look forward to your reply. Yours sincerely, Visual Rights Group Ltd, Company No. 11747843, Polhill Business Centre, London Road, Polhill, TN14 7AA, Registered Address: 42-44 Clarendon Road, Watford WD17 1JJ
https://flawlesscbd.co.uk/collections/cbd-gummies
Hi, It has come to our attention that you are using our client’s photographs on your site without a valid licence. We have already posted out all supporting documents to the address of your office. Please confirm once you have received them. In the meantime, we would like to invite you to settle this dispute by making the below payment of £500. Visual Rights Group Ltd, KBC Bank London, IBAN: GB39 KRED 1654 8703, 1135 11, Account Number: 03113511, Sort Code: 16-54-87 Once you have made the payment, please email us with your payment reference number. Please note that a failure to settle at this stage will only accrue greater costs once the matter is referred to court. I thank you for your cooperation and look forward to your reply. Yours sincerely, Visual Rights Group Ltd, Company No. 11747843, Polhill Business Centre, London Road, Polhill, TN14 7AA, Registered Address: 42-44 Clarendon Road, Watford WD17 1JJ
https://vitl-cbd.com/
Hi, It has come to our attention that you are using our client’s photographs on your site without a valid licence. We have already posted out all supporting documents to the address of your office. Please confirm once you have received them. In the meantime, we would like to invite you to settle this dispute by making the below payment of £500. Visual Rights Group Ltd, KBC Bank London, IBAN: GB39 KRED 1654 8703, 1135 11, Account Number: 03113511, Sort Code: 16-54-87 Once you have made the payment, please email us with your payment reference number. Please note that a failure to settle at this stage will only accrue greater costs once the matter is referred to court. I thank you for your cooperation and look forward to your reply. Yours sincerely, Visual Rights Group Ltd, Company No. 11747843, Polhill Business Centre, London Road, Polhill, TN14 7AA, Registered Address: 42-44 Clarendon Road, Watford WD17 1JJ
https://herbalhealthcbd.co.uk/product-category/cbd-gummies/
Hi, It has come to our attention that you are using our client’s photographs on your site without a valid licence. We have already posted out all supporting documents to the address of your office. Please confirm once you have received them. In the meantime, we would like to invite you to settle this dispute by making the below payment of £500. Visual Rights Group Ltd, KBC Bank London, IBAN: GB39 KRED 1654 8703, 1135 11, Account Number: 03113511, Sort Code: 16-54-87 Once you have made the payment, please email us with your payment reference number. Please note that a failure to settle at this stage will only accrue greater costs once the matter is referred to court. I thank you for your cooperation and look forward to your reply. Yours sincerely, Visual Rights Group Ltd, Company No. 11747843, Polhill Business Centre, London Road, Polhill, TN14 7AA, Registered Address: 42-44 Clarendon Road, Watford WD17 1JJ
https://britishcannabis.org/shop/cbd-gummies/
Hi, It has come to our attention that you are using our client’s photographs on your site without a valid licence. We have already posted out all supporting documents to the address of your office. Please confirm once you have received them. In the meantime, we would like to invite you to settle this dispute by making the below payment of £500. Visual Rights Group Ltd, KBC Bank London, IBAN: GB39 KRED 1654 8703, 1135 11, Account Number: 03113511, Sort Code: 16-54-87 Once you have made the payment, please email us with your payment reference number. Please note that a failure to settle at this stage will only accrue greater costs once the matter is referred to court. I thank you for your cooperation and look forward to your reply. Yours sincerely, Visual Rights Group Ltd, Company No. 11747843, Polhill Business Centre, London Road, Polhill, TN14 7AA, Registered Address: 42-44 Clarendon Road, Watford WD17 1JJ
https://supremecbd.uk/collections/cbd-edibles
Hi, It has come to our attention that you are using our client’s photographs on your site without a valid licence. We have already posted out all supporting documents to the address of your office. Please confirm once you have received them. In the meantime, we would like to invite you to settle this dispute by making the below payment of £500. Visual Rights Group Ltd, KBC Bank London, IBAN: GB39 KRED 1654 8703, 1135 11, Account Number: 03113511, Sort Code: 16-54-87 Once you have made the payment, please email us with your payment reference number. Please note that a failure to settle at this stage will only accrue greater costs once the matter is referred to court. I thank you for your cooperation and look forward to your reply. Yours sincerely, Visual Rights Group Ltd, Company No. 11747843, Polhill Business Centre, London Road, Polhill, TN14 7AA, Registered Address: 42-44 Clarendon Road, Watford WD17 1JJ
https://www.goodrays.com/collections/cbd-gummies/
Hi, It has come to our attention that you are using our client’s photographs on your site without a valid licence. We have already posted out all supporting documents to the address of your office. Please confirm once you have received them. In the meantime, we would like to invite you to settle this dispute by making the below payment of £500. Visual Rights Group Ltd, KBC Bank London, IBAN: GB39 KRED 1654 8703, 1135 11, Account Number: 03113511, Sort Code: 16-54-87 Once you have made the payment, please email us with your payment reference number. Please note that a failure to settle at this stage will only accrue greater costs once the matter is referred to court. I thank you for your cooperation and look forward to your reply. Yours sincerely, Visual Rights Group Ltd, Company No. 11747843, Polhill Business Centre, London Road, Polhill, TN14 7AA, Registered Address: 42-44 Clarendon Road, Watford WD17 1JJ
https://www.simply-cbd.co.uk/collections/cbd-gummies-edibles
Hi, It has come to our attention that you are using our client’s photographs on your site without a valid licence. We have already posted out all supporting documents to the address of your office. Please confirm once you have received them. In the meantime, we would like to invite you to settle this dispute by making the below payment of £500. Visual Rights Group Ltd, KBC Bank London, IBAN: GB39 KRED 1654 8703, 1135 11, Account Number: 03113511, Sort Code: 16-54-87 Once you have made the payment, please email us with your payment reference number. Please note that a failure to settle at this stage will only accrue greater costs once the matter is referred to court. I thank you for your cooperation and look forward to your reply. Yours sincerely, Visual Rights Group Ltd, Company No. 11747843, Polhill Business Centre, London Road, Polhill, TN14 7AA, Registered Address: 42-44 Clarendon Road, Watford WD17 1JJ
https://www.cbdoil.co.uk/product-category/cbd-gummies/
Hi, It has come to our attention that you are using our client’s photographs on your site without a valid licence. We have already posted out all supporting documents to the address of your office. Please confirm once you have received them. In the meantime, we would like to invite you to settle this dispute by making the below payment of £500. Visual Rights Group Ltd, KBC Bank London, IBAN: GB39 KRED 1654 8703, 1135 11, Account Number: 03113511, Sort Code: 16-54-87 Once you have made the payment, please email us with your payment reference number. Please note that a failure to settle at this stage will only accrue greater costs once the matter is referred to court. I thank you for your cooperation and look forward to your reply. Yours sincerely, Visual Rights Group Ltd, Company No. 11747843, Polhill Business Centre, London Road, Polhill, TN14 7AA, Registered Address: 42-44 Clarendon Road, Watford WD17 1JJ
https://britishcannabis.org/shop/cbd-gummies/
CBD Gummies – Cannabidiol Gummies Discover the pinnacle of CBD indulgence with CBD Guru’s exquisite CBD Gummies. Crafted with precision and care, our premium CBD Gummies UK are designed to elevate your wellness routine to new heights. Immerse yourself in a world of natural relief and delightful flavours, all packed into each delicious gummy variety. At CBD Guru, we take pride in sourcing the highest-quality hemp extracts to create products that transcend ordinary CBD edibles. Our CBD Gummies are meticulously formulated to provide a consistent and reliable CBD experience, ensuring you receive the full benefits of this remarkable compound. CBD sweets and gummies are precisely as they sound – delicious gummy sweets that deliver cannabidiol. They can be infused with a variety of CBD infusions, ingredients, and flavours. The design can be simple, extravagant, decadent, and everything in between. When it comes to choosing the best CBD sweets & edibles, you’ll have to take the time to find ones that speak to your taste buds. Premium Quality: We use only the finest hemp extracts, ensuring a pure and potent CBD product. Delicious Flavours: Indulge in a variety of mouth-watering flavours that make incorporating CBD into your routine a tasty delight. Trusted Transparency: With CBD Guru, you can trust the transparency of our products. Our products are third-party lab tested for quality and potency. Wellness Beyond Ordinary: Elevate your well-being with the natural benefits of CBD, known for its potential to support relaxation and balance.
https://www.cbd-guru.co.uk/product-category/cbd-gummies/
How many CBD gummies should I start with? If you are new to CBD we recommend starting off with a lower dose. Your metabolism and body weight will also determine how many gummies you should take and how long it will take the for it to take effect. All of our packaging comes with recommended guidelines. Are your gummies Vegan? Yes. We’re proud to say that all of our gummies are 100 vegan and made with plant-based ingredients and do not contain any animal products or by products. How do CBD gummies work? Taking our edibles is convenient, efficient, and effective method for introducing the potential benefits of cannabidiol into your body. The cannabinoids in gummies are processed through your digestive system and interact with receptors located throughout your body. Are CBD gummies safe to take? In the UK, CBD gummies are classified as food supplements, so they must abide by the same regulations as other products within this category. This requires all ingredients to be safe and for clear labelling to be present, along with a straightforward description that accurately reflects the product being sold. How long does it take CBD Gummies to kick in? We get asked a lot about how long it takes for our gummies to kick in, and the the answer is, it can vary from person to person. Factors like your body weight, metabolism, and the strength and dosage of the gummies can all play a role. But in general, you can expect to start feeling the effects within 30 minutes to an hour after eating them. It’s important to keep in mind that the effects can last for several hours, so be patient and give them some time to work their magic. We recommend starting with a lower dosage and gradually increasing until you find what works best for you. What do CBD Gummies do to your body? ccording to a recent report by Harvard University, there is some evidence to show that CBD gummies can improve a number of issues, ranging from stress to helping you switch off at night. Try them for yourself and always speak to a doctor first!Can you get high from taking CBD gummies? A question our customer services team often gets asked is: Can you get high from CBD gummies? The answer is No. Our gummies are specifically formulated to contain 0 THC. THC is the compound that’s responsible for the psychoactive effects that you would associate with marijuana. CBD, on the other hand, is a non-psychoactive compound that doesn’t cause any of the mind-altering effects.
https://orangecounty-cbd.com/collections/cbd-gummies-sweets
How delicious are our CBD gummies? Don’t just take our word for it, professional football player, John Hartson, said “I take the 4800mg gummies and I love them. I don’t have to worry about missing my CBD, all I do is put the tub in my gym bag and I can take it in between sessions. I can already feel the benefits and the flavours are great”. If that’s still not enough, just check out our amazing 5 star reviews on Trustpilot from over 3000 testimonials from happy customers across the UK. Join the SupremeCBD family today to start benefiting from our incredible edibles. Free UK Delivery on All Orders Over £50 Enjoy FREE UK delivery on all orders of £50 or more. Don’t miss out on this amazing offer and make the most of your CBD experience with our delicious gummies, delivered straight to your door! Shop now and unlock the power of CBD Gummies in the UK
https://supremecbd.uk/collections/cbd-edibles
Getting your daily dose of CBD has just got even easier with SupremeCBD thanks to our range of mouth watering CBD Gummies. Our CBD Gummies are designed to be easy to take, easy to store, and easy to have while you’re out and about. All you have to do is simply pop your grab bag or tub in your bag for easy reach when you need them most. And because our gummies are the size of most jelly sweets, they’re the perfect addition to your morning routine and easy to take. CBD Gummies are also one of the best ways to take your CBD safe in the knowledge that they’ll be working their magic and providing beneficial goodness for hours. Our Grab Bags Are Perfect For Taking CBD Gummies On The Go If you have a busy lifestyle – family, work, kids – it’s easy to forget about taking your CBD when you need it, which is why we have you covered. To make it easy to get your regular dose of CBD you can now buy our CBD gummies in handy grab-bags, as well as our recyclable tubs. And not only that, we now offer an amazing variety of delicious flavours and shapes, ranging from worms and strawberries, to our mouth watering cherries and bears. So now you never need a reason to miss your CBD, all you have to do is pop them in your hand bag, gym bag, or even pop them in your pocket and you’ll always have them within reach, ensuring you never miss your dose. How Many Gummies Can You Take? This is a question we get asked a lot. Understanding the right amount of CBD gummies you should take depends on a couple of factors, 1) Your desired effect 2) your individual tolerance and body weight. At SupremeCBD we understand that everyone’s needs and preferences are unique which is why we put together this handy blog: “how many gummies should I eat?”. But if you’re looking for a quick answer, we recommend starting with one gummy and waiting for about an hour to see how it affects you. If you feel the need to increase your dosage try taking another edible until you find an amount that works for you. One thing you can be sure of is that each of our CBD gummies are carefully made to offer you a delicious, and enjoyable way to maintain your overall physical and mental well-being. If you have any questions feel fee to contact our team. Alternatively you can always consult with a healthcare professional if you have any concerns or are unsure about the right dosage for you. 100 Gluten Free and Vegan CBD Gummies Did we forget to mention that our CBD edibles can be enjoyed by all? Whether you have an intolerance to gluten or you are vegan, we have made sure you can still enjoy our delicious range of CBD gummies. All of our gummies are 100 gluten-free and vegan, making them a perfect choice if you have specific dietary requirements. Looking after all of our customers is important to us which is why we have meticulously crafted our edibles to provide you with a guilt-free way to enjoy the benefits of CBD everyday. Our Customers and Ambassadors Love Our CBD Gummies
https://flawlesscbd.co.uk/collections/cbd-gummies
Whether you’re a seasoned CBD enthusiast or just beginning your wellness journey, CBD Guru’s CBD Gummies are the perfect companion. Boost your daily routine with a burst of flavour and the holistic benefits of high-quality CBD. Shop with confidence, knowing you’re choosing a product that’s crafted with expertise and a commitment to your well-being. Correctly manufactured CBD sweets should never get you high. These products must be extracted from industrial hemp, which contains inactive amounts of THC. Without THC, these items will remain non-psychoactive and buzz-free. Consulting lab-test results is always an essential step before purchasing cannabidiol. If you can lock-eyes on results indicating a pure, and THC free product, then you run zero risk of catching a buzz. CBD Guru’s broad-spectrum formula contains viable levels of many hemp compounds but does not contain detectable amounts of THC. Get to know your supplier, and learn to read CBD lab test results. This only takes a little bit of effort, and if it ensures that you will have access to quality cannabidiol. We guarantee that it is worth your time. Support this budding industry by learning about CBD, browsing the highest quality goods, and discovering how to choose the best cannabidiol items on the market. The THC concentrations in CBD Guru products are below detectable levels. These THC-free broad-spectrum CBD Gummies will never flag a drug test. The reason for this is simple: no one tests for CBD. Athletes can use it in the Olympics, the elderly are thriving on these products, and plenty of people are only taking these products to enhance their daily lives. There is no penalty for taking a thoroughly tested and carefully formulated cannabidiol product. Your mind and body will thank you, and local law-enforcement agents recognise the legal availability of these hemp items. You never need to worry when purchasing a CBD gummy product. At first, many customers may have asked themselves, “Is it legal to buy CBD Gummies in the UK?” The answer is an absolute yes. The UN WHO (World Health Organisation) has stated that products containing under 0.2 THC should be distributed freely. Regulators in the UK have not classified CBD as a food, cosmetic, or medicinal, indicating that it can be bought and sold without issue. The hemp used to create these tasty treats are all grown in Colorado, a state notorious for its legal cannabis and hemp cultivation. These premium plants are held to the high standards of the CO state regulations. The plant material is processed and infused into our premium products in GMP facilities that produce food-grade products.The importation of these hemp products is legal, while the extraction of cannabinoids from any hemp plant is still not allowed in the UK. Although the nation is turning to other sources to procure its medicinal cannabis and hemp supply, there will be a wait before we can cultivate our own UK grown plants. In the meantime, we choose farmers who uphold the best organic and sustainable hemp farming practices. Using CBD sweets & gummies is an easy task. All you need to do is to savour and eat these delicious products to get your daily dose. You can eat these back to back, but pay attention to the dosage. We know that the flavour of our gummies can be quite enticing, but you may want to save your gummies and eat only the minimum effective dose. Before purchasing these items, check the amount of total CBD mg in your selected package and the CBD mg amount of individual pieces. If you are buying CBD for the first time, start with pieces with low mg amounts such as 20mg gummies. This will allow you to easily explore various dosages and find out how your body responds.
https://www.cbdoil.co.uk/product-category/cbd-gummies/
These reputable brands are recognised for their dedication to quality, transparent sourcing and manufacturing practices, as well as positive feedback from customers. However, it is vital to consider that the optimal selection for you may be influenced by your personal preferences and specific necessities.It’s advisable to explore different brands and read reviews to find the best CBD Gummies that align with your needs and taste preferences.
https://britishcannabis.org/shop/cbd-gummies/
Using CBD sweets is an easy task. All you need to do is to savour and eat these delicious products to get your daily dose. You can eat these back to back, but pay attention to the dosage. We know that the flavour of our CBD sweets can be quite enticing, but you may want to save your sweets and eat only the minimum effective dose. Before purchasing these items, check the amount of total CBD mg in your selected package and the CBD mg amount of individual pieces. If you are buying CBD for the first time, start with pieces with low mg amounts such as 5mg or 10mg gummies. This will allow you to easily explore various dosages and find out how your body responds.
https://orangecounty-cbd.com/collections/cbd-gummies-sweets
How to take CBD Gummies for the best results: There are many benefits of CBD Gummies, but the question of how to take them is still a bit mysterious. Here are some of the most common questions and answers.You can also read more about their ingredients. You may also be interested in how to take them at work. After all, how can CBD gummy help you in the office? Let’s find out! Keep reading! Then, you will be able to decide if they are for you! Taking CBD Gummies with you to work is a convenient way to boost your energy levels and combat anxiety. These tasty treats do not take up much space and will not disturb your day. Besides, there are no obvious side effects that will draw attention to your consumption.These tasty Gummies are as harmless as any other supplement or medication. So, you can use them without worrying about being judged or ridiculed. CBD is an effective pain reliever. When taken regularly, these Gummies can significantly boost your energy levels. It has been shown that CBD improves the ECS, which regulates sleep-wake cycles. This in turn leads to less pain.CBD Gummies offer a delicious way to boost your energy levels and get the rest you need at work. For optimal results, use a single dose every day CBD Gummies are a popular way to supplement your CBD intake. They are made from hemp extracts and come in a variety of flavours. CBD Gummies dosing:osing depends on your body’s tolerance to cannabidiol (CBD) and how much you’re willing to consume. They are easy to take, but the proper dosage for you will depend on your weight and the strength of the gummy.CBD is a compound extracted from the hemp plant, a member of the cannabis plant family. CBD is extracted from the hemp plant and is known as CBD oil. Dosage will depend on the desired effects. The recommended dose for adults is 0.25mg to 0.5mg per kilogram of body weight. Regular CBD dosages will improve immune function, limit environmental hypersensitivity, and reduce minor discomfort.You can double your dosage to 0.5mg every 8 hours or up to twice a day. If you feel like you need more CBD, you can double or triple it. To take CBD in gummies, you can either take one or two gummies once or twice a day. Taking CBD Gummies with you everywhere:
https://www.drugs.com/lifestyle/cbd-gummies-health-benefits-3515165/
How delicious are our CBD gummies? Don’t just take our word for it, professional football player, John Hartson, said “I take the 4800mg gummies and I love them. I don’t have to worry about missing my CBD, all I do is put the tub in my gym bag and I can take it in between sessions. I can already feel the benefits and the flavours are great”. If that’s still not enough, just check out our amazing 5 star reviews on Trustpilot from over 3000 testimonials from happy customers across the UK. Join the SupremeCBD family today to start benefiting from our incredible edibles. Free UK Delivery on All Orders Over £50 Enjoy FREE UK delivery on all orders of £50 or more. Don’t miss out on this amazing offer and make the most of your CBD experience with our delicious gummies, delivered straight to your door! Shop now and unlock the power of CBD Gummies in the UK
https://britishcbd.net/cbd-uk/cbd-edibles/
Getting your daily dose of CBD has just got even easier with SupremeCBD thanks to our range of mouth watering CBD Gummies. Our CBD Gummies are designed to be easy to take, easy to store, and easy to have while you’re out and about. All you have to do is simply pop your grab bag or tub in your bag for easy reach when you need them most. And because our gummies are the size of most jelly sweets, they’re the perfect addition to your morning routine and easy to take. CBD Gummies are also one of the best ways to take your CBD safe in the knowledge that they’ll be working their magic and providing beneficial goodness for hours. Our Grab Bags Are Perfect For Taking CBD Gummies On The Go If you have a busy lifestyle – family, work, kids – it’s easy to forget about taking your CBD when you need it, which is why we have you covered. To make it easy to get your regular dose of CBD you can now buy our CBD gummies in handy grab-bags, as well as our recyclable tubs. And not only that, we now offer an amazing variety of delicious flavours and shapes, ranging from worms and strawberries, to our mouth watering cherries and bears. So now you never need a reason to miss your CBD, all you have to do is pop them in your hand bag, gym bag, or even pop them in your pocket and you’ll always have them within reach, ensuring you never miss your dose. How Many Gummies Can You Take? This is a question we get asked a lot. Understanding the right amount of CBD gummies you should take depends on a couple of factors, 1) Your desired effect 2) your individual tolerance and body weight. At SupremeCBD we understand that everyone’s needs and preferences are unique which is why we put together this handy blog: “how many gummies should I eat?”. But if you’re looking for a quick answer, we recommend starting with one gummy and waiting for about an hour to see how it affects you. If you feel the need to increase your dosage try taking another edible until you find an amount that works for you. One thing you can be sure of is that each of our CBD gummies are carefully made to offer you a delicious, and enjoyable way to maintain your overall physical and mental well-being. If you have any questions feel fee to contact our team. Alternatively you can always consult with a healthcare professional if you have any concerns or are unsure about the right dosage for you. 100 Gluten Free and Vegan CBD Gummies Did we forget to mention that our CBD edibles can be enjoyed by all? Whether you have an intolerance to gluten or you are vegan, we have made sure you can still enjoy our delicious range of CBD gummies. All of our gummies are 100 gluten-free and vegan, making them a perfect choice if you have specific dietary requirements. Looking after all of our customers is important to us which is why we have meticulously crafted our edibles to provide you with a guilt-free way to enjoy the benefits of CBD everyday. Our Customers and Ambassadors Love Our CBD Gummies
https://www.drugs.com/lifestyle/cbd-gummies-health-benefits-3515165/
Whether you’re a seasoned CBD enthusiast or just beginning your wellness journey, CBD Guru’s CBD Gummies are the perfect companion. Boost your daily routine with a burst of flavour and the holistic benefits of high-quality CBD. Shop with confidence, knowing you’re choosing a product that’s crafted with expertise and a commitment to your well-being. Correctly manufactured CBD sweets should never get you high. These products must be extracted from industrial hemp, which contains inactive amounts of THC. Without THC, these items will remain non-psychoactive and buzz-free. Consulting lab-test results is always an essential step before purchasing cannabidiol. If you can lock-eyes on results indicating a pure, and THC free product, then you run zero risk of catching a buzz. CBD Guru’s broad-spectrum formula contains viable levels of many hemp compounds but does not contain detectable amounts of THC. Get to know your supplier, and learn to read CBD lab test results. This only takes a little bit of effort, and if it ensures that you will have access to quality cannabidiol. We guarantee that it is worth your time. Support this budding industry by learning about CBD, browsing the highest quality goods, and discovering how to choose the best cannabidiol items on the market. The THC concentrations in CBD Guru products are below detectable levels. These THC-free broad-spectrum CBD Gummies will never flag a drug test. The reason for this is simple: no one tests for CBD. Athletes can use it in the Olympics, the elderly are thriving on these products, and plenty of people are only taking these products to enhance their daily lives. There is no penalty for taking a thoroughly tested and carefully formulated cannabidiol product. Your mind and body will thank you, and local law-enforcement agents recognise the legal availability of these hemp items. You never need to worry when purchasing a CBD gummy product. At first, many customers may have asked themselves, “Is it legal to buy CBD Gummies in the UK?” The answer is an absolute yes. The UN WHO (World Health Organisation) has stated that products containing under 0.2 THC should be distributed freely. Regulators in the UK have not classified CBD as a food, cosmetic, or medicinal, indicating that it can be bought and sold without issue. The hemp used to create these tasty treats are all grown in Colorado, a state notorious for its legal cannabis and hemp cultivation. These premium plants are held to the high standards of the CO state regulations. The plant material is processed and infused into our premium products in GMP facilities that produce food-grade products.The importation of these hemp products is legal, while the extraction of cannabinoids from any hemp plant is still not allowed in the UK. Although the nation is turning to other sources to procure its medicinal cannabis and hemp supply, there will be a wait before we can cultivate our own UK grown plants. In the meantime, we choose farmers who uphold the best organic and sustainable hemp farming practices. Using CBD sweets & gummies is an easy task. All you need to do is to savour and eat these delicious products to get your daily dose. You can eat these back to back, but pay attention to the dosage. We know that the flavour of our gummies can be quite enticing, but you may want to save your gummies and eat only the minimum effective dose. Before purchasing these items, check the amount of total CBD mg in your selected package and the CBD mg amount of individual pieces. If you are buying CBD for the first time, start with pieces with low mg amounts such as 20mg gummies. This will allow you to easily explore various dosages and find out how your body responds.
https://britishcannabis.org/shop/cbd-gummies/
How many CBD gummies should I start with? If you are new to CBD we recommend starting off with a lower dose. Your metabolism and body weight will also determine how many gummies you should take and how long it will take the for it to take effect. All of our packaging comes with recommended guidelines. Are your gummies Vegan? Yes. We’re proud to say that all of our gummies are 100 vegan and made with plant-based ingredients and do not contain any animal products or by products. How do CBD gummies work? Taking our edibles is convenient, efficient, and effective method for introducing the potential benefits of cannabidiol into your body. The cannabinoids in gummies are processed through your digestive system and interact with receptors located throughout your body. Are CBD gummies safe to take? In the UK, CBD gummies are classified as food supplements, so they must abide by the same regulations as other products within this category. This requires all ingredients to be safe and for clear labelling to be present, along with a straightforward description that accurately reflects the product being sold. How long does it take CBD Gummies to kick in? We get asked a lot about how long it takes for our gummies to kick in, and the the answer is, it can vary from person to person. Factors like your body weight, metabolism, and the strength and dosage of the gummies can all play a role. But in general, you can expect to start feeling the effects within 30 minutes to an hour after eating them. It’s important to keep in mind that the effects can last for several hours, so be patient and give them some time to work their magic. We recommend starting with a lower dosage and gradually increasing until you find what works best for you. What do CBD Gummies do to your body? ccording to a recent report by Harvard University, there is some evidence to show that CBD gummies can improve a number of issues, ranging from stress to helping you switch off at night. Try them for yourself and always speak to a doctor first!Can you get high from taking CBD gummies? A question our customer services team often gets asked is: Can you get high from CBD gummies? The answer is No. Our gummies are specifically formulated to contain 0 THC. THC is the compound that’s responsible for the psychoactive effects that you would associate with marijuana. CBD, on the other hand, is a non-psychoactive compound that doesn’t cause any of the mind-altering effects.
https://www.simply-cbd.co.uk/products/cbd-gummies?variant=42521725862112
How to take CBD Gummies for the best results: There are many benefits of CBD Gummies, but the question of how to take them is still a bit mysterious. Here are some of the most common questions and answers.You can also read more about their ingredients. You may also be interested in how to take them at work. After all, how can CBD gummy help you in the office? Let’s find out! Keep reading! Then, you will be able to decide if they are for you! Taking CBD Gummies with you to work is a convenient way to boost your energy levels and combat anxiety. These tasty treats do not take up much space and will not disturb your day. Besides, there are no obvious side effects that will draw attention to your consumption.These tasty Gummies are as harmless as any other supplement or medication. So, you can use them without worrying about being judged or ridiculed. CBD is an effective pain reliever. When taken regularly, these Gummies can significantly boost your energy levels. It has been shown that CBD improves the ECS, which regulates sleep-wake cycles. This in turn leads to less pain.CBD Gummies offer a delicious way to boost your energy levels and get the rest you need at work. For optimal results, use a single dose every day CBD Gummies are a popular way to supplement your CBD intake. They are made from hemp extracts and come in a variety of flavours. CBD Gummies dosing:osing depends on your body’s tolerance to cannabidiol (CBD) and how much you’re willing to consume. They are easy to take, but the proper dosage for you will depend on your weight and the strength of the gummy.CBD is a compound extracted from the hemp plant, a member of the cannabis plant family. CBD is extracted from the hemp plant and is known as CBD oil. Dosage will depend on the desired effects. The recommended dose for adults is 0.25mg to 0.5mg per kilogram of body weight. Regular CBD dosages will improve immune function, limit environmental hypersensitivity, and reduce minor discomfort.You can double your dosage to 0.5mg every 8 hours or up to twice a day. If you feel like you need more CBD, you can double or triple it. To take CBD in gummies, you can either take one or two gummies once or twice a day. Taking CBD Gummies with you everywhere:
https://www.cbd-guru.co.uk/product-category/cbd-gummies/
Getting your daily dose of CBD has just got even easier with SupremeCBD thanks to our range of mouth watering CBD Gummies. Our CBD Gummies are designed to be easy to take, easy to store, and easy to have while you’re out and about. All you have to do is simply pop your grab bag or tub in your bag for easy reach when you need them most. And because our gummies are the size of most jelly sweets, they’re the perfect addition to your morning routine and easy to take. CBD Gummies are also one of the best ways to take your CBD safe in the knowledge that they’ll be working their magic and providing beneficial goodness for hours. Our Grab Bags Are Perfect For Taking CBD Gummies On The Go If you have a busy lifestyle – family, work, kids – it’s easy to forget about taking your CBD when you need it, which is why we have you covered. To make it easy to get your regular dose of CBD you can now buy our CBD gummies in handy grab-bags, as well as our recyclable tubs. And not only that, we now offer an amazing variety of delicious flavours and shapes, ranging from worms and strawberries, to our mouth watering cherries and bears. So now you never need a reason to miss your CBD, all you have to do is pop them in your hand bag, gym bag, or even pop them in your pocket and you’ll always have them within reach, ensuring you never miss your dose. How Many Gummies Can You Take? This is a question we get asked a lot. Understanding the right amount of CBD gummies you should take depends on a couple of factors, 1) Your desired effect 2) your individual tolerance and body weight. At SupremeCBD we understand that everyone’s needs and preferences are unique which is why we put together this handy blog: “how many gummies should I eat?”. But if you’re looking for a quick answer, we recommend starting with one gummy and waiting for about an hour to see how it affects you. If you feel the need to increase your dosage try taking another edible until you find an amount that works for you. One thing you can be sure of is that each of our CBD gummies are carefully made to offer you a delicious, and enjoyable way to maintain your overall physical and mental well-being. If you have any questions feel fee to contact our team. Alternatively you can always consult with a healthcare professional if you have any concerns or are unsure about the right dosage for you. 100 Gluten Free and Vegan CBD Gummies Did we forget to mention that our CBD edibles can be enjoyed by all? Whether you have an intolerance to gluten or you are vegan, we have made sure you can still enjoy our delicious range of CBD gummies. All of our gummies are 100 gluten-free and vegan, making them a perfect choice if you have specific dietary requirements. Looking after all of our customers is important to us which is why we have meticulously crafted our edibles to provide you with a guilt-free way to enjoy the benefits of CBD everyday. Our Customers and Ambassadors Love Our CBD Gummies
https://orangecounty-cbd.com/collections/cbd-gummies-sweets
Your CBD experience will rely greatly on a number of factors. These include personal bioavailability factors (such as height, weight, and body mass), the strength of your CBD oil product, and the supporting ingredients. In general, CBD has a gentle calming effect for the mind and body. In CBD oil sweets, containing ingredients to boost energy or nutrition, that calming effect can help to focus the mind. In relaxation-based products, that calming effect can be more pronounced — especially CBD products formulated for sleep.Is CBD Legal In The UK?Yes! CBD is legal in the UK, provided the product contains less than 0.2 THC as measured by dry weight.
https://supremecbd.uk/collections/cbd-edibles
What do you need to know before buying CBD Gummies UK?This guide will help you understand how to take CBD Gummies, how CBD Gummies work, and offer guidance on CBD gummy dosing. You’ll also get a glimpse into the various methods of administering CBD and cannabis products. It’s as easy as 1-2-3 to use CBD. Potential Benefits of CBD Gummies in the UKCBD Gummies in the UK are known for their potential to harmonize with the body’s endocannabinoid system, which plays a key role in regulating a variety of bodily functions.Research indicates that CBD is an effective option for pain management. CBD Gummies for pain might be an option for you. These gummies, made from hemp extracts, are a favoured choice for supplementing your CBD intake. Available in various flavours, they offer an enjoyable and convenient method to consume CBD.When consumed, CBD Gummies are believed to offer several positive effects, such as promoting relaxation, aiding in stress reduction, and contributing to a sense of calm. They are also associated with enhancing sleep quality and fostering an overall feeling of wellness.Some users report experiencing a soothing effect on their minds and a sense of physical balance. Some users also said CBD gummies for pain are effective.For further information, especially regarding questions like “Can you drive after taking CBD Gummies?”, it’s important to note that experiences can vary from person to person.Therefore, starting with a smaller dosage and adjusting as needed is recommended to gauge individual response.CBD Gummies UK 2024BD Gummies UKDosing CBD GummiesDosing depends on your body’s tolerance to cannabidiol (CBD) and how much you’re willing to consume. They are easy to take, but the proper dosage for you will depend on your weight and the strength of the gummy.CBD is a compound extracted from the hemp plant, a member of the cannabis plant family.CBD is extracted from the hemp plant and is known as CBD oil. Dosages will depend on the desired effects. The recommended dose for adults is 0.25mg to 0.5mg per kilogram of body weight. Studies suggest regular CBD dosages can improve immune function, limit environmental hypersensitivity, and reduce minor discomfort.You have the option to increase your dosage by 0.5mg every 8 hours, or even twice daily. Should you find the need for more CBD, doubling or tripling the amount is possible.For CBD in gummy form, consider taking either one or two gummies once or twice a day.Take Your CBD Gummies with you Everywhereur best selling CBD Gummies in the UK are a new tasty twist on the typical CBD supplement, providing a convenient and fun way to get your daily dose of CBD.CBD Gummies manufactured by BRITISH CANNABIS are infused with a premium CBD extract, available in a variety of flavours and shapes.CBD Gummies are THC-free, sugar-free and suitable for vegan and vegetarian diets. Gummies offer a convenient method to administer CBD daily.The CBD in our gummies is not a sedative, so it will not make you feel sleepy. You should be mindful of your body’s signals to know how much CBD you should take.Best CBD Gummies UK should not replace a varied balanced diet, perhaps use your gummies intake as a reminder to drink plenty of water. Choosing the Right CBD Gummiesefore buying CBD gummies, it’s important to thoroughly examine their ingredients. Requesting a certificate of analysis for any CBD Gummies is advisable, ensuring they contain no more than 0.3 THC.These certificates also confirm the gummies have undergone lab tests to verify they are free from harmful contaminants and pesticides.While exploring the best CBD Gummies in the UK, pay close attention to their contents. Many gummies available are made with CBD isolate, which lacks other beneficial cannabinoids.On the other hand, broad-spectrum hemp extracts include a variety of legal cannabinoids and plant constituents.It’s worth noting that full-spectrum CBD gummies might have trace amounts of THC, but typically in very small quantities.Taking CBD Gummies with you to workCBD gummies are a convenient and discreet option for supporting a healthy lifestyle, particularly in managing everyday stress at work.These small, easy-to-carry treats offer a simple way to incorporate wellness into your daily routine without drawing attention.Using CBD gummies is akin to incorporating any regular health supplement into your day. They offer a non-intrusive and judgment-free approach to wellness maintenance.Many individuals choose CBD gummies as a means to support overall health and well-being. Regular consumption is often suggested for maintaining a balanced lifestyle.
https://flawlesscbd.co.uk/collections/cbd-gummies
Getting your daily dose of CBD has just got even easier with SupremeCBD thanks to our range of mouth watering CBD Gummies. Our CBD Gummies are designed to be easy to take, easy to store, and easy to have while you’re out and about. All you have to do is simply pop your grab bag or tub in your bag for easy reach when you need them most. And because our gummies are the size of most jelly sweets, they’re the perfect addition to your morning routine and easy to take. CBD Gummies are also one of the best ways to take your CBD safe in the knowledge that they’ll be working their magic and providing beneficial goodness for hours. Our Grab Bags Are Perfect For Taking CBD Gummies On The Go If you have a busy lifestyle – family, work, kids – it’s easy to forget about taking your CBD when you need it, which is why we have you covered. To make it easy to get your regular dose of CBD you can now buy our CBD gummies in handy grab-bags, as well as our recyclable tubs. And not only that, we now offer an amazing variety of delicious flavours and shapes, ranging from worms and strawberries, to our mouth watering cherries and bears. So now you never need a reason to miss your CBD, all you have to do is pop them in your hand bag, gym bag, or even pop them in your pocket and you’ll always have them within reach, ensuring you never miss your dose. How Many Gummies Can You Take? This is a question we get asked a lot. Understanding the right amount of CBD gummies you should take depends on a couple of factors, 1) Your desired effect 2) your individual tolerance and body weight. At SupremeCBD we understand that everyone’s needs and preferences are unique which is why we put together this handy blog: “how many gummies should I eat?”. But if you’re looking for a quick answer, we recommend starting with one gummy and waiting for about an hour to see how it affects you. If you feel the need to increase your dosage try taking another edible until you find an amount that works for you. One thing you can be sure of is that each of our CBD gummies are carefully made to offer you a delicious, and enjoyable way to maintain your overall physical and mental well-being. If you have any questions feel fee to contact our team. Alternatively you can always consult with a healthcare professional if you have any concerns or are unsure about the right dosage for you. 100 Gluten Free and Vegan CBD Gummies Did we forget to mention that our CBD edibles can be enjoyed by all? Whether you have an intolerance to gluten or you are vegan, we have made sure you can still enjoy our delicious range of CBD gummies. All of our gummies are 100 gluten-free and vegan, making them a perfect choice if you have specific dietary requirements. Looking after all of our customers is important to us which is why we have meticulously crafted our edibles to provide you with a guilt-free way to enjoy the benefits of CBD everyday. Our Customers and Ambassadors Love Our CBD Gummies
https://britishcbd.net/cbd-uk/cbd-edibles/
The THC concentrations in CBD Guru products are below detectable levels. These THC-free broad-spectrum CBD Gummies will never flag a drug test. The reason for this is simple: no one tests for CBD. Athletes can use it in the Olympics, the elderly are thriving on these products, and plenty of people are only taking these products to enhance their daily lives. There is no penalty for taking a thoroughly tested and carefully formulated cannabidiol product. Your mind and body will thank you, and local law-enforcement agents recognise the legal availability of these hemp items. You never need to worry when purchasing a CBD gummy product.
https://www.cbd-guru.co.uk/product-category/cbd-gummies/
These reputable brands are recognised for their dedication to quality, transparent sourcing and manufacturing practices, as well as positive feedback from customers. However, it is vital to consider that the optimal selection for you may be influenced by your personal preferences and specific necessities.It’s advisable to explore different brands and read reviews to find the best CBD Gummies that align with your needs and taste preferences.
https://www.cbdoil.co.uk/product-category/cbd-gummies/
How delicious are our CBD gummies? Don’t just take our word for it, professional football player, John Hartson, said “I take the 4800mg gummies and I love them. I don’t have to worry about missing my CBD, all I do is put the tub in my gym bag and I can take it in between sessions. I can already feel the benefits and the flavours are great”. If that’s still not enough, just check out our amazing 5 star reviews on Trustpilot from over 3000 testimonials from happy customers across the UK. Join the SupremeCBD family today to start benefiting from our incredible edibles. Free UK Delivery on All Orders Over £50 Enjoy FREE UK delivery on all orders of £50 or more. Don’t miss out on this amazing offer and make the most of your CBD experience with our delicious gummies, delivered straight to your door! Shop now and unlock the power of CBD Gummies in the UK
https://britishcannabis.org/shop/cbd-gummies/
CBD edibles provide all the wellness-promoting benefits of CBD in a tasty, on the go treat! If you’re new to CBD, edibles are a great option if you don’t like the taste of CBD oil or struggle to swallow capsules. They also offer an easy way to track and tailor your CBD consumption to best suit your needs. From CBD Jelly Domes to CBD Dark Chocolate Balls, we provide premium, broad-spectrum CBD edibles to satisfy your sweet tooth while delivering all the benefits of CBD. Decide which CBD edible is right for you and get started on your CBD journey!CBD oil has a natural, earthy flavour which for first-time users can be quite unpleasant. This flavour is masked by CBD edibles which are a fun way to enjoy your daily dose of CBD at home or on the move. That being said, we also offer a range of flavoured CBD oils if you’re looking for something more palatable.The main difference between CBD oil and CBD edibles is the rate of absorption. CBD edibles have a delayed onset because your body takes time to digest and metabolise them, whereas CBD oils taken sublingually (placed under your tongue) are absorbed by your mucus membranes and thus enter into your bloodstream faster. With sublingual application, you’ll feel the effects much more quickly but how long CBD stays in your system depends on a variety of factors.
https://lovehemp.com/collections/cbd-edibles
Getting your daily dose of CBD has just got even easier with SupremeCBD thanks to our range of mouth watering CBD Gummies. Our CBD Gummies are designed to be easy to take, easy to store, and easy to have while you’re out and about. All you have to do is simply pop your grab bag or tub in your bag for easy reach when you need them most. And because our gummies are the size of most jelly sweets, they’re the perfect addition to your morning routine and easy to take. CBD Gummies are also one of the best ways to take your CBD safe in the knowledge that they’ll be working their magic and providing beneficial goodness for hours. Our Grab Bags Are Perfect For Taking CBD Gummies On The Go If you have a busy lifestyle – family, work, kids – it’s easy to forget about taking your CBD when you need it, which is why we have you covered. To make it easy to get your regular dose of CBD you can now buy our CBD gummies in handy grab-bags, as well as our recyclable tubs. And not only that, we now offer an amazing variety of delicious flavours and shapes, ranging from worms and strawberries, to our mouth watering cherries and bears. So now you never need a reason to miss your CBD, all you have to do is pop them in your hand bag, gym bag, or even pop them in your pocket and you’ll always have them within reach, ensuring you never miss your dose. How Many Gummies Can You Take? This is a question we get asked a lot. Understanding the right amount of CBD gummies you should take depends on a couple of factors, 1) Your desired effect 2) your individual tolerance and body weight. At SupremeCBD we understand that everyone’s needs and preferences are unique which is why we put together this handy blog: “how many gummies should I eat?”. But if you’re looking for a quick answer, we recommend starting with one gummy and waiting for about an hour to see how it affects you. If you feel the need to increase your dosage try taking another edible until you find an amount that works for you. One thing you can be sure of is that each of our CBD gummies are carefully made to offer you a delicious, and enjoyable way to maintain your overall physical and mental well-being. If you have any questions feel fee to contact our team. Alternatively you can always consult with a healthcare professional if you have any concerns or are unsure about the right dosage for you. 100 Gluten Free and Vegan CBD Gummies Did we forget to mention that our CBD edibles can be enjoyed by all? Whether you have an intolerance to gluten or you are vegan, we have made sure you can still enjoy our delicious range of CBD gummies. All of our gummies are 100 gluten-free and vegan, making them a perfect choice if you have specific dietary requirements. Looking after all of our customers is important to us which is why we have meticulously crafted our edibles to provide you with a guilt-free way to enjoy the benefits of CBD everyday. Our Customers and Ambassadors Love Our CBD Gummies
https://vitalitycbd.co.uk/products/cbd-gummy-bears
Hi, It has come to our attention that you are using our client’s photographs on your site without a valid licence. We have already posted out all supporting documents to the address of your office. Please confirm once you have received them. In the meantime, we would like to invite you to settle this dispute by making the below payment of £500. Visual Rights Group Ltd, KBC Bank London, IBAN: GB39 KRED 1654 8703, 1135 11, Account Number: 03113511, Sort Code: 16-54-87 Once you have made the payment, please email us with your payment reference number. Please note that a failure to settle at this stage will only accrue greater costs once the matter is referred to court. I thank you for your cooperation and look forward to your reply. Yours sincerely, Visual Rights Group Ltd, Company No. 11747843, Polhill Business Centre, London Road, Polhill, TN14 7AA, Registered Address: 42-44 Clarendon Road, Watford WD17 1JJ
https://cbdfx.co.uk/collections/cbd-gummies
Hi, It has come to our attention that you are using our client’s photographs on your site without a valid licence. We have already posted out all supporting documents to the address of your office. Please confirm once you have received them. In the meantime, we would like to invite you to settle this dispute by making the below payment of £500. Visual Rights Group Ltd, KBC Bank London, IBAN: GB39 KRED 1654 8703, 1135 11, Account Number: 03113511, Sort Code: 16-54-87 Once you have made the payment, please email us with your payment reference number. Please note that a failure to settle at this stage will only accrue greater costs once the matter is referred to court. I thank you for your cooperation and look forward to your reply. Yours sincerely, Visual Rights Group Ltd, Company No. 11747843, Polhill Business Centre, London Road, Polhill, TN14 7AA, Registered Address: 42-44 Clarendon Road, Watford WD17 1JJ
https://herbalhealthcbd.co.uk/product-category/cbd-gummies/
Hi, It has come to our attention that you are using our client’s photographs on your site without a valid licence. We have already posted out all supporting documents to the address of your office. Please confirm once you have received them. In the meantime, we would like to invite you to settle this dispute by making the below payment of £500. Visual Rights Group Ltd, KBC Bank London, IBAN: GB39 KRED 1654 8703, 1135 11, Account Number: 03113511, Sort Code: 16-54-87 Once you have made the payment, please email us with your payment reference number. Please note that a failure to settle at this stage will only accrue greater costs once the matter is referred to court. I thank you for your cooperation and look forward to your reply. Yours sincerely, Visual Rights Group Ltd, Company No. 11747843, Polhill Business Centre, London Road, Polhill, TN14 7AA, Registered Address: 42-44 Clarendon Road, Watford WD17 1JJ
https://www.simply-cbd.co.uk/collections/cbd-gummies-edibles
Hi, It has come to our attention that you are using our client’s photographs on your site without a valid licence. We have already posted out all supporting documents to the address of your office. Please confirm once you have received them. In the meantime, we would like to invite you to settle this dispute by making the below payment of £500. Visual Rights Group Ltd, KBC Bank London, IBAN: GB39 KRED 1654 8703, 1135 11, Account Number: 03113511, Sort Code: 16-54-87 Once you have made the payment, please email us with your payment reference number. Please note that a failure to settle at this stage will only accrue greater costs once the matter is referred to court. I thank you for your cooperation and look forward to your reply. Yours sincerely, Visual Rights Group Ltd, Company No. 11747843, Polhill Business Centre, London Road, Polhill, TN14 7AA, Registered Address: 42-44 Clarendon Road, Watford WD17 1JJ
https://vitl-cbd.com/
Your eloquent writing and in-depth analysis are always a pleasure to read.
http://brooksqtjf614.iamarrows.com/unraveling-foreclosure-secrets-strategies-for-property-reclamation
Hi, It has come to our attention that you are using our client’s photographs on your site without a valid licence. We have already posted out all supporting documents to the address of your office. Please confirm once you have received them. In the meantime, we would like to invite you to settle this dispute by making the below payment of £500. Visual Rights Group Ltd, KBC Bank London, IBAN: GB39 KRED 1654 8703, 1135 11, Account Number: 03113511, Sort Code: 16-54-87 Once you have made the payment, please email us with your payment reference number. Please note that a failure to settle at this stage will only accrue greater costs once the matter is referred to court. I thank you for your cooperation and look forward to your reply. Yours sincerely, Visual Rights Group Ltd, Company No. 11747843, Polhill Business Centre, London Road, Polhill, TN14 7AA, Registered Address: 42-44 Clarendon Road, Watford WD17 1JJ
https://www.healthline.com/health/best-cbd-gummies
Hi, It has come to our attention that you are using our client’s photographs on your site without a valid licence. We have already posted out all supporting documents to the address of your office. Please confirm once you have received them. In the meantime, we would like to invite you to settle this dispute by making the below payment of £500. Visual Rights Group Ltd, KBC Bank London, IBAN: GB39 KRED 1654 8703, 1135 11, Account Number: 03113511, Sort Code: 16-54-87 Once you have made the payment, please email us with your payment reference number. Please note that a failure to settle at this stage will only accrue greater costs once the matter is referred to court. I thank you for your cooperation and look forward to your reply. Yours sincerely, Visual Rights Group Ltd, Company No. 11747843, Polhill Business Centre, London Road, Polhill, TN14 7AA, Registered Address: 42-44 Clarendon Road, Watford WD17 1JJ
https://www.cbd-guru.co.uk/product-category/cbd-gummies/
Hi, It has come to our attention that you are using our client’s photographs on your site without a valid licence. We have already posted out all supporting documents to the address of your office. Please confirm once you have received them. In the meantime, we would like to invite you to settle this dispute by making the below payment of £500. Visual Rights Group Ltd, KBC Bank London, IBAN: GB39 KRED 1654 8703, 1135 11, Account Number: 03113511, Sort Code: 16-54-87 Once you have made the payment, please email us with your payment reference number. Please note that a failure to settle at this stage will only accrue greater costs once the matter is referred to court. I thank you for your cooperation and look forward to your reply. Yours sincerely, Visual Rights Group Ltd, Company No. 11747843, Polhill Business Centre, London Road, Polhill, TN14 7AA, Registered Address: 42-44 Clarendon Road, Watford WD17 1JJ
https://supremecbd.uk/collections/cbd-edibles
Hi, It has come to our attention that you are using our client’s photographs on your site without a valid licence. We have already posted out all supporting documents to the address of your office. Please confirm once you have received them. In the meantime, we would like to invite you to settle this dispute by making the below payment of £500. Visual Rights Group Ltd, KBC Bank London, IBAN: GB39 KRED 1654 8703, 1135 11, Account Number: 03113511, Sort Code: 16-54-87 Once you have made the payment, please email us with your payment reference number. Please note that a failure to settle at this stage will only accrue greater costs once the matter is referred to court. I thank you for your cooperation and look forward to your reply. Yours sincerely, Visual Rights Group Ltd, Company No. 11747843, Polhill Business Centre, London Road, Polhill, TN14 7AA, Registered Address: 42-44 Clarendon Road, Watford WD17 1JJ
https://www.brownscbd.co.uk/cbd-gummies-uk-37-c.asp
Hi, It has come to our attention that you are using our client’s photographs on your site without a valid licence. We have already posted out all supporting documents to the address of your office. Please confirm once you have received them. In the meantime, we would like to invite you to settle this dispute by making the below payment of £500. Visual Rights Group Ltd, KBC Bank London, IBAN: GB39 KRED 1654 8703, 1135 11, Account Number: 03113511, Sort Code: 16-54-87 Once you have made the payment, please email us with your payment reference number. Please note that a failure to settle at this stage will only accrue greater costs once the matter is referred to court. I thank you for your cooperation and look forward to your reply. Yours sincerely, Visual Rights Group Ltd, Company No. 11747843, Polhill Business Centre, London Road, Polhill, TN14 7AA, Registered Address: 42-44 Clarendon Road, Watford WD17 1JJ
https://www.cbd-guru.co.uk/product-category/cbd-gummies/
Hi, It has come to our attention that you are using our client’s photographs on your site without a valid licence. We have already posted out all supporting documents to the address of your office. Please confirm once you have received them. In the meantime, we would like to invite you to settle this dispute by making the below payment of £500. Visual Rights Group Ltd, KBC Bank London, IBAN: GB39 KRED 1654 8703, 1135 11, Account Number: 03113511, Sort Code: 16-54-87 Once you have made the payment, please email us with your payment reference number. Please note that a failure to settle at this stage will only accrue greater costs once the matter is referred to court. I thank you for your cooperation and look forward to your reply. Yours sincerely, Visual Rights Group Ltd, Company No. 11747843, Polhill Business Centre, London Road, Polhill, TN14 7AA, Registered Address: 42-44 Clarendon Road, Watford WD17 1JJ
https://cannaraycbd.com/shop/gummies/
Hi, It has come to our attention that you are using our client’s photographs on your site without a valid licence. We have already posted out all supporting documents to the address of your office. Please confirm once you have received them. In the meantime, we would like to invite you to settle this dispute by making the below payment of £500. Visual Rights Group Ltd, KBC Bank London, IBAN: GB39 KRED 1654 8703, 1135 11, Account Number: 03113511, Sort Code: 16-54-87 Once you have made the payment, please email us with your payment reference number. Please note that a failure to settle at this stage will only accrue greater costs once the matter is referred to court. I thank you for your cooperation and look forward to your reply. Yours sincerely, Visual Rights Group Ltd, Company No. 11747843, Polhill Business Centre, London Road, Polhill, TN14 7AA, Registered Address: 42-44 Clarendon Road, Watford WD17 1JJ
https://www.cbd-guru.co.uk/product-category/cbd-gummies/
Hi, It has come to our attention that you are using our client’s photographs on your site without a valid licence. We have already posted out all supporting documents to the address of your office. Please confirm once you have received them. In the meantime, we would like to invite you to settle this dispute by making the below payment of £500. Visual Rights Group Ltd, KBC Bank London, IBAN: GB39 KRED 1654 8703, 1135 11, Account Number: 03113511, Sort Code: 16-54-87 Once you have made the payment, please email us with your payment reference number. Please note that a failure to settle at this stage will only accrue greater costs once the matter is referred to court. I thank you for your cooperation and look forward to your reply. Yours sincerely, Visual Rights Group Ltd, Company No. 11747843, Polhill Business Centre, London Road, Polhill, TN14 7AA, Registered Address: 42-44 Clarendon Road, Watford WD17 1JJ
https://vitalitycbd.co.uk/products/cbd-gummy-bears
Hi, It has come to our attention that you are using our client’s photographs on your site without a valid licence. We have already posted out all supporting documents to the address of your office. Please confirm once you have received them. In the meantime, we would like to invite you to settle this dispute by making the below payment of £500. Visual Rights Group Ltd, KBC Bank London, IBAN: GB39 KRED 1654 8703, 1135 11, Account Number: 03113511, Sort Code: 16-54-87 Once you have made the payment, please email us with your payment reference number. Please note that a failure to settle at this stage will only accrue greater costs once the matter is referred to court. I thank you for your cooperation and look forward to your reply. Yours sincerely, Visual Rights Group Ltd, Company No. 11747843, Polhill Business Centre, London Road, Polhill, TN14 7AA, Registered Address: 42-44 Clarendon Road, Watford WD17 1JJ
https://lovehemp.com/collections/cbd-edibles
Hi, It has come to our attention that you are using our client’s photographs on your site without a valid licence. We have already posted out all supporting documents to the address of your office. Please confirm once you have received them. In the meantime, we would like to invite you to settle this dispute by making the below payment of £500. Visual Rights Group Ltd, KBC Bank London, IBAN: GB39 KRED 1654 8703, 1135 11, Account Number: 03113511, Sort Code: 16-54-87 Once you have made the payment, please email us with your payment reference number. Please note that a failure to settle at this stage will only accrue greater costs once the matter is referred to court. I thank you for your cooperation and look forward to your reply. Yours sincerely, Visual Rights Group Ltd, Company No. 11747843, Polhill Business Centre, London Road, Polhill, TN14 7AA, Registered Address: 42-44 Clarendon Road, Watford WD17 1JJ
https://herbalhealthcbd.co.uk/product-category/cbd-gummies/
Hi, It has come to our attention that you are using our client’s photographs on your site without a valid licence. We have already posted out all supporting documents to the address of your office. Please confirm once you have received them. In the meantime, we would like to invite you to settle this dispute by making the below payment of £500. Visual Rights Group Ltd, KBC Bank London, IBAN: GB39 KRED 1654 8703, 1135 11, Account Number: 03113511, Sort Code: 16-54-87 Once you have made the payment, please email us with your payment reference number. Please note that a failure to settle at this stage will only accrue greater costs once the matter is referred to court. I thank you for your cooperation and look forward to your reply. Yours sincerely, Visual Rights Group Ltd, Company No. 11747843, Polhill Business Centre, London Road, Polhill, TN14 7AA, Registered Address: 42-44 Clarendon Road, Watford WD17 1JJ
https://supremecbd.uk/collections/cbd-edibles
Hi, It has come to our attention that you are using our client’s photographs on your site without a valid licence. We have already posted out all supporting documents to the address of your office. Please confirm once you have received them. In the meantime, we would like to invite you to settle this dispute by making the below payment of £500. Visual Rights Group Ltd, KBC Bank London, IBAN: GB39 KRED 1654 8703, 1135 11, Account Number: 03113511, Sort Code: 16-54-87 Once you have made the payment, please email us with your payment reference number. Please note that a failure to settle at this stage will only accrue greater costs once the matter is referred to court. I thank you for your cooperation and look forward to your reply. Yours sincerely, Visual Rights Group Ltd, Company No. 11747843, Polhill Business Centre, London Road, Polhill, TN14 7AA, Registered Address: 42-44 Clarendon Road, Watford WD17 1JJ
https://vitl-cbd.com/
Hi, It has come to our attention that you are using our client’s photographs on your site without a valid licence. We have already posted out all supporting documents to the address of your office. Please confirm once you have received them. In the meantime, we would like to invite you to settle this dispute by making the below payment of £500. Visual Rights Group Ltd, KBC Bank London, IBAN: GB39 KRED 1654 8703, 1135 11, Account Number: 03113511, Sort Code: 16-54-87 Once you have made the payment, please email us with your payment reference number. Please note that a failure to settle at this stage will only accrue greater costs once the matter is referred to court. I thank you for your cooperation and look forward to your reply. Yours sincerely, Visual Rights Group Ltd, Company No. 11747843, Polhill Business Centre, London Road, Polhill, TN14 7AA, Registered Address: 42-44 Clarendon Road, Watford WD17 1JJ
https://herbalhealthcbd.co.uk/product-category/cbd-gummies/
Hi, It has come to our attention that you are using our client’s photographs on your site without a valid licence. We have already posted out all supporting documents to the address of your office. Please confirm once you have received them. In the meantime, we would like to invite you to settle this dispute by making the below payment of £500. Visual Rights Group Ltd, KBC Bank London, IBAN: GB39 KRED 1654 8703, 1135 11, Account Number: 03113511, Sort Code: 16-54-87 Once you have made the payment, please email us with your payment reference number. Please note that a failure to settle at this stage will only accrue greater costs once the matter is referred to court. I thank you for your cooperation and look forward to your reply. Yours sincerely, Visual Rights Group Ltd, Company No. 11747843, Polhill Business Centre, London Road, Polhill, TN14 7AA, Registered Address: 42-44 Clarendon Road, Watford WD17 1JJ
https://cannaraycbd.com/shop/gummies/
Hi, It has come to our attention that you are using our client’s photographs on your site without a valid licence. We have already posted out all supporting documents to the address of your office. Please confirm once you have received them. In the meantime, we would like to invite you to settle this dispute by making the below payment of £500. Visual Rights Group Ltd, KBC Bank London, IBAN: GB39 KRED 1654 8703, 1135 11, Account Number: 03113511, Sort Code: 16-54-87 Once you have made the payment, please email us with your payment reference number. Please note that a failure to settle at this stage will only accrue greater costs once the matter is referred to court. I thank you for your cooperation and look forward to your reply. Yours sincerely, Visual Rights Group Ltd, Company No. 11747843, Polhill Business Centre, London Road, Polhill, TN14 7AA, Registered Address: 42-44 Clarendon Road, Watford WD17 1JJ
https://supremecbd.uk/collections/cbd-edibles
Hi, It has come to our attention that you are using our client’s photographs on your site without a valid licence. We have already posted out all supporting documents to the address of your office. Please confirm once you have received them. In the meantime, we would like to invite you to settle this dispute by making the below payment of £500. Visual Rights Group Ltd, KBC Bank London, IBAN: GB39 KRED 1654 8703, 1135 11, Account Number: 03113511, Sort Code: 16-54-87 Once you have made the payment, please email us with your payment reference number. Please note that a failure to settle at this stage will only accrue greater costs once the matter is referred to court. I thank you for your cooperation and look forward to your reply. Yours sincerely, Visual Rights Group Ltd, Company No. 11747843, Polhill Business Centre, London Road, Polhill, TN14 7AA, Registered Address: 42-44 Clarendon Road, Watford WD17 1JJ
https://www.brownscbd.co.uk/cbd-gummies-uk-37-c.asp
Hi, It has come to our attention that you are using our client’s photographs on your site without a valid licence. We have already posted out all supporting documents to the address of your office. Please confirm once you have received them. In the meantime, we would like to invite you to settle this dispute by making the below payment of £500. Visual Rights Group Ltd, KBC Bank London, IBAN: GB39 KRED 1654 8703, 1135 11, Account Number: 03113511, Sort Code: 16-54-87 Once you have made the payment, please email us with your payment reference number. Please note that a failure to settle at this stage will only accrue greater costs once the matter is referred to court. I thank you for your cooperation and look forward to your reply. Yours sincerely, Visual Rights Group Ltd, Company No. 11747843, Polhill Business Centre, London Road, Polhill, TN14 7AA, Registered Address: 42-44 Clarendon Road, Watford WD17 1JJ
https://herbalhealthcbd.co.uk/product-category/cbd-gummies/
Can you be more specific about the content of your article? After reading it, I still have some doubts. Hope you can help me.
Hi, It has come to our attention that you are using our client’s photographs on your site without a valid licence. We have already posted out all supporting documents to the address of your office. Please confirm once you have received them. In the meantime, we would like to invite you to settle this dispute by making the below payment of £500. Visual Rights Group Ltd, KBC Bank London, IBAN: GB39 KRED 1654 8703, 1135 11, Account Number: 03113511, Sort Code: 16-54-87 Once you have made the payment, please email us with your payment reference number. Please note that a failure to settle at this stage will only accrue greater costs once the matter is referred to court. I thank you for your cooperation and look forward to your reply. Yours sincerely, Visual Rights Group Ltd, Company No. 11747843, Polhill Business Centre, London Road, Polhill, TN14 7AA, Registered Address: 42-44 Clarendon Road, Watford WD17 1JJ
https://orangecounty-cbd.com/collections/cbd-gummies-sweets
Hi, It has come to our attention that you are using our client’s photographs on your site without a valid licence. We have already posted out all supporting documents to the address of your office. Please confirm once you have received them. In the meantime, we would like to invite you to settle this dispute by making the below payment of £500. Visual Rights Group Ltd, KBC Bank London, IBAN: GB39 KRED 1654 8703, 1135 11, Account Number: 03113511, Sort Code: 16-54-87 Once you have made the payment, please email us with your payment reference number. Please note that a failure to settle at this stage will only accrue greater costs once the matter is referred to court. I thank you for your cooperation and look forward to your reply. Yours sincerely, Visual Rights Group Ltd, Company No. 11747843, Polhill Business Centre, London Road, Polhill, TN14 7AA, Registered Address: 42-44 Clarendon Road, Watford WD17 1JJ
https://lovehemp.com/collections/cbd-edibles
Hi, It has come to our attention that you are using our client’s photographs on your site without a valid licence. We have already posted out all supporting documents to the address of your office. Please confirm once you have received them. In the meantime, we would like to invite you to settle this dispute by making the below payment of £500. Visual Rights Group Ltd, KBC Bank London, IBAN: GB39 KRED 1654 8703, 1135 11, Account Number: 03113511, Sort Code: 16-54-87 Once you have made the payment, please email us with your payment reference number. Please note that a failure to settle at this stage will only accrue greater costs once the matter is referred to court. I thank you for your cooperation and look forward to your reply. Yours sincerely, Visual Rights Group Ltd, Company No. 11747843, Polhill Business Centre, London Road, Polhill, TN14 7AA, Registered Address: 42-44 Clarendon Road, Watford WD17 1JJ
https://britishcannabis.org/shop/cbd-gummies/
Your article helped me a lot, is there any more related content? Thanks!
Hi, It has come to our attention that you are using our client’s photographs on your site without a valid licence. We have already posted out all supporting documents to the address of your office. Please confirm once you have received them. In the meantime, we would like to invite you to settle this dispute by making the below payment of £500. Visual Rights Group Ltd, KBC Bank London, IBAN: GB39 KRED 1654 8703, 1135 11, Account Number: 03113511, Sort Code: 16-54-87 Once you have made the payment, please email us with your payment reference number. Please note that a failure to settle at this stage will only accrue greater costs once the matter is referred to court. I thank you for your cooperation and look forward to your reply. Yours sincerely, Visual Rights Group Ltd, Company No. 11747843, Polhill Business Centre, London Road, Polhill, TN14 7AA, Registered Address: 42-44 Clarendon Road, Watford WD17 1JJ
https://vitl-cbd.com/
Hi, It has come to our attention that you are using our client’s photographs on your site without a valid licence. We have already posted out all supporting documents to the address of your office. Please confirm once you have received them. In the meantime, we would like to invite you to settle this dispute by making the below payment of £500. Visual Rights Group Ltd, KBC Bank London, IBAN: GB39 KRED 1654 8703, 1135 11, Account Number: 03113511, Sort Code: 16-54-87 Once you have made the payment, please email us with your payment reference number. Please note that a failure to settle at this stage will only accrue greater costs once the matter is referred to court. I thank you for your cooperation and look forward to your reply. Yours sincerely, Visual Rights Group Ltd, Company No. 11747843, Polhill Business Centre, London Road, Polhill, TN14 7AA, Registered Address: 42-44 Clarendon Road, Watford WD17 1JJ
https://britishcbd.net/cbd-uk/cbd-edibles/
Hi, It has come to our attention that you are using our client’s photographs on your site without a valid licence. We have already posted out all supporting documents to the address of your office. Please confirm once you have received them. In the meantime, we would like to invite you to settle this dispute by making the below payment of £500. Visual Rights Group Ltd, KBC Bank London, IBAN: GB39 KRED 1654 8703, 1135 11, Account Number: 03113511, Sort Code: 16-54-87 Once you have made the payment, please email us with your payment reference number. Please note that a failure to settle at this stage will only accrue greater costs once the matter is referred to court. I thank you for your cooperation and look forward to your reply. Yours sincerely, Visual Rights Group Ltd, Company No. 11747843, Polhill Business Centre, London Road, Polhill, TN14 7AA, Registered Address: 42-44 Clarendon Road, Watford WD17 1JJ
https://www.cbdoil.co.uk/product-category/cbd-gummies/
Hi, It has come to our attention that you are using our client’s photographs on your site without a valid licence. We have already posted out all supporting documents to the address of your office. Please confirm once you have received them. In the meantime, we would like to invite you to settle this dispute by making the below payment of £500. Visual Rights Group Ltd, KBC Bank London, IBAN: GB39 KRED 1654 8703, 1135 11, Account Number: 03113511, Sort Code: 16-54-87 Once you have made the payment, please email us with your payment reference number. Please note that a failure to settle at this stage will only accrue greater costs once the matter is referred to court. I thank you for your cooperation and look forward to your reply. Yours sincerely, Visual Rights Group Ltd, Company No. 11747843, Polhill Business Centre, London Road, Polhill, TN14 7AA, Registered Address: 42-44 Clarendon Road, Watford WD17 1JJ
https://cbdfx.co.uk/collections/cbd-gummies
Hi, It has come to our attention that you are using our client’s photographs on your site without a valid licence. We have already posted out all supporting documents to the address of your office. Please confirm once you have received them. In the meantime, we would like to invite you to settle this dispute by making the below payment of £500. Visual Rights Group Ltd, KBC Bank London, IBAN: GB39 KRED 1654 8703, 1135 11, Account Number: 03113511, Sort Code: 16-54-87 Once you have made the payment, please email us with your payment reference number. Please note that a failure to settle at this stage will only accrue greater costs once the matter is referred to court. I thank you for your cooperation and look forward to your reply. Yours sincerely, Visual Rights Group Ltd, Company No. 11747843, Polhill Business Centre, London Road, Polhill, TN14 7AA, Registered Address: 42-44 Clarendon Road, Watford WD17 1JJ
https://britishcannabis.org/shop/cbd-gummies/
Hi, It has come to our attention that you are using our client’s photographs on your site without a valid licence. We have already posted out all supporting documents to the address of your office. Please confirm once you have received them. In the meantime, we would like to invite you to settle this dispute by making the below payment of £500. Visual Rights Group Ltd, KBC Bank London, IBAN: GB39 KRED 1654 8703, 1135 11, Account Number: 03113511, Sort Code: 16-54-87 Once you have made the payment, please email us with your payment reference number. Please note that a failure to settle at this stage will only accrue greater costs once the matter is referred to court. I thank you for your cooperation and look forward to your reply. Yours sincerely, Visual Rights Group Ltd, Company No. 11747843, Polhill Business Centre, London Road, Polhill, TN14 7AA, Registered Address: 42-44 Clarendon Road, Watford WD17 1JJ
https://vitalitycbd.co.uk/products/cbd-gummy-bears
Hi, It has come to our attention that you are using our client’s photographs on your site without a valid licence. We have already posted out all supporting documents to the address of your office. Please confirm once you have received them. In the meantime, we would like to invite you to settle this dispute by making the below payment of £500. Visual Rights Group Ltd, KBC Bank London, IBAN: GB39 KRED 1654 8703, 1135 11, Account Number: 03113511, Sort Code: 16-54-87 Once you have made the payment, please email us with your payment reference number. Please note that a failure to settle at this stage will only accrue greater costs once the matter is referred to court. I thank you for your cooperation and look forward to your reply. Yours sincerely, Visual Rights Group Ltd, Company No. 11747843, Polhill Business Centre, London Road, Polhill, TN14 7AA, Registered Address: 42-44 Clarendon Road, Watford WD17 1JJ
https://www.brownscbd.co.uk/cbd-gummies-uk-37-c.asp
Hi, It has come to our attention that you are using our client’s photographs on your site without a valid licence. We have already posted out all supporting documents to the address of your office. Please confirm once you have received them. In the meantime, we would like to invite you to settle this dispute by making the below payment of £500. Visual Rights Group Ltd, KBC Bank London, IBAN: GB39 KRED 1654 8703, 1135 11, Account Number: 03113511, Sort Code: 16-54-87 Once you have made the payment, please email us with your payment reference number. Please note that a failure to settle at this stage will only accrue greater costs once the matter is referred to court. I thank you for your cooperation and look forward to your reply. Yours sincerely, Visual Rights Group Ltd, Company No. 11747843, Polhill Business Centre, London Road, Polhill, TN14 7AA, Registered Address: 42-44 Clarendon Road, Watford WD17 1JJ
https://www.cbd-guru.co.uk/product-category/cbd-gummies/
Wow, awesome weblog structure! How lengthy have you
been running a blog for? you make blogging look
easy. The overall look of your web site is magnificent, as well
as the content! You can see similar here e-commerce
Wow, incredible weblog format! How lengthy have you been blogging for?
you make running a blog look easy. The full look of your web site is excellent, as smartly as the content!
You can see similar here dobry sklep
Wow, amazing weblog structure! How lengthy have you ever been blogging for?
you made blogging glance easy. The total look of your website is excellent,
let alone the content! You can see similar here sklep
Wow, wonderful blog structure! How lengthy have you been blogging
for? you made running a blog glance easy. The full glance of your site is excellent,
as neatly as the content! You can see similar here najlepszy sklep
Wow, superb weblog structure! How lengthy have you ever been blogging for?
you make running a blog glance easy. The entire glance of your web site is great,
let alone the content! You can see similar here najlepszy sklep
Wow, amazing weblog format! How lengthy have you been blogging for?
you make blogging glance easy. The full glance of your web site is great, as neatly as
the content! You can see similar here sklep internetowy
Wow, fantastic weblog layout! How long have you been running
a blog for? you made running a blog glance easy.
The full glance of your site is wonderful, let
alone the content material! You can see similar here
sklep online
Wow, marvelous blog structure! How long have you ever been blogging for?
you make blogging look easy. The whole look of your website
is fantastic, let alone the content! You can see similar here dobry sklep
Wow, fantastic blog format! How long have you been blogging for?
you make blogging glance easy. The overall look of your web
site is wonderful, as well as the content material!
You can see similar here sklep internetowy
Wow, superb weblog structure! How lengthy have you been running a
blog for? you make blogging look easy. The whole glance of your
website is magnificent, as smartly as the content material!
You can see similar here e-commerce
Wow, marvelous blog layout! How long have you ever been blogging for?
you make running a blog glance easy. The whole
look of your web site is wonderful, as well as the content material!
You can see similar here sklep
Wow, amazing weblog layout! How long have you
ever been running a blog for? you made running a blog
look easy. The whole look of your website is fantastic, let alone the content material!
You can see similar here dobry sklep
Wow, marvelous blog layout! How long have you been running a blog for?
you make blogging look easy. The whole glance of your site is wonderful, as neatly as the content!
You can see similar here najlepszy sklep
Wow, fantastic weblog layout! How long have you been running a blog for?
you made running a blog look easy. The whole glance
of your website is magnificent, as neatly as the content material!
You can see similar here sklep
Wow, fantastic blog layout! How long have you been blogging for?
you make running a blog look easy. The overall look
of your web site is great, let alone the content! You
can see similar here sklep online
Wow, awesome blog structure! How lengthy have you ever been running a blog for?
you make blogging look easy. The total look of your site is fantastic,
let alone the content! You can see similar here najlepszy sklep
Wow, superb weblog structure! How lengthy have you been running a blog for?
you make running a blog glance easy. The entire
look of your web site is excellent, let alone the content!
You can see similar here dobry sklep
Wow, awesome weblog format! How lengthy have you been blogging for?
you made running a blog look easy. The entire look of your site is excellent,
as smartly as the content! You can see similar here sklep internetowy
Wow, marvelous weblog layout! How long have you been blogging
for? you made blogging glance easy. The overall look of your site is wonderful,
let alone the content material! You can see similar here dobry sklep
Your article helped me a lot, is there any more related content? Thanks!
Very good article. I’m dealing with some of these issues as well..
https://jibe.google.com/url?sa=i&url=http://www.ohiovalleyalloys.com/node/277711
https://images.google.com.br/url?sa=i&url=https://batchgeo.com/map/charlotte-nc-tree-services
I seriously love your website.. Great colors & theme. Did you make this amazing site yourself? Please reply back as I’m attempting to create my own personal blog and would like to know where you got this from or exactly what the theme is called. Many thanks!
https://de.batchgeo.com/map/charlotte-nc-tree-services
I must thank you for the efforts you’ve put in writing this blog. I am hoping to check out the same high-grade content from you later on as well. In fact, your creative writing abilities has inspired me to get my own, personal site now 😉
https://www.google.com.na/url?sa=i&url=https://www.buzzfeed.com/gmbmarketingsolutions
https://www.dailymotion.com/video/k1b0rVP1hJc2uNAeGc2
where to buy prednisone 5443 without prescription
brazilian pharmacy online
batmanapollo.ru
Your comprehensive method to writing is what sets your blog site apart.
https://physics-tutors.s3.us-west-004.backblazeb2.com/physics-tutor-physics-tutors-physics-tutoring-private-tutors-in-physics.html
Ad opus! — За дело!
Absit verbo invidia — Не взыщите на слове.